Your First Battle
You’ve met the basic ideas, maybe even built a tiny bot. Now it’s time for the fun part: watching bots fight.
This page walks you through starting your very first battle in:
- Classic Robocode
- Robocode Tank Royale
You don’t need a fancy bot yet. Any simple or sample bot is enough. The only hard rule: you must have at least two bots in a battle, otherwise the game ends immediately because there’s only one bot “left”.
Prerequisites: What You Need
Before you start a battle, make sure you have:
- A working installation of:
- Classic Robocode, or
- Robocode Tank Royale (GUI + example bots)
- At least two bots available:
- Your own simple bot (for example, from the Your First Bot chapter), and
- At least one opponent bot (often a sample bot).
Note
With Robocode Tank Royale, the server and booter come built-in with the GUI. You do not need to install the server (for running battles) or booter (for booting bots locally) separately, unless you wish to use them as stand-alone applications. Stand-alone versions are provided in releases for running the server and/or booter without the GUI.
Sample bots and opponent ideas
- Classic Robocode
- Comes with many sample bots, grouped in
sample.*packages (e.g.,sample.SittingDuck,sample.SpinBot). - These are perfect opponents for your first battle.
- Comes with many sample bots, grouped in
- Robocode Tank Royale
- Provides sample bots as part of the distribution or example repositories.
- You can use those, plus any bot you’ve created yourself.
Tip
Don’t overthink your first opponent. A simple “dummy” bot is fine; the goal is to see a battle run from start to finish.
Your First Battle in Classic Robocode
Classic Robocode runs everything inside a single GUI: bot selection, battlefield, and scores.
Launching Robocode and Selecting Bots
Start Robocode
Launch the Robocode application as you normally would on your system.Create a new battle
- In the menu, choose Battle → New… (or similar, depending on the version).
- A bot selection dialog appears.
Pick your bots
- On the left, you’ll see a list of available bots (including the
sample.*bots). - On the right, you’ll see the bots that will take part in the battle.
- Select:
- Your own bot (if you have one), and
- At least one sample bot as the opponent.
- Use the Add >> button or double-click to move bots to the selected list.
- On the left, you’ll see a list of available bots (including the
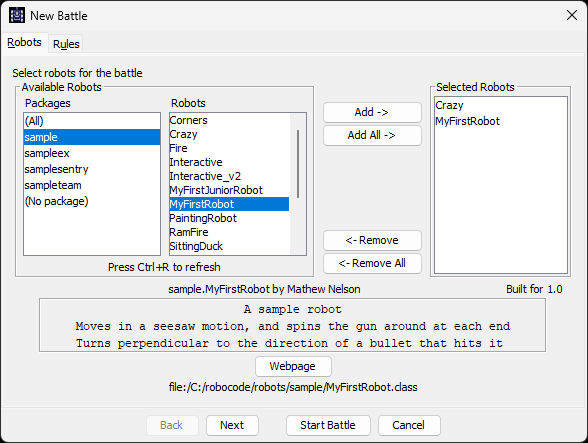
Bot selection dialog
Make sure the selected bots list contains at least two bots. If there is only one, the battle either will not start or will end immediately.
Configuring Basic Battle Settings
For your very first battle, you can keep things simple:
Battlefield size
- The default size is good enough for a test.
- You can experiment with larger or smaller fields later.
Number of rounds
- Fewer rounds (e.g., 3–5) make your first tests quicker.
- More rounds give more stable results when comparing bots.
Unless you have a reason to change them, the default settings are fine.
Running the Battle and Watching What Happens
- Click OK (or Start Battle) to begin.
- The battlefield window opens and rounds begin.
Pay attention to:
- Which bot is yours (name and color).
- How your bot moves, turns, and fires.
- When it gets hit by bullets or runs into walls.
- The status panel showing energy, round number, and scores.
Robocode runs multiple rounds in a single battle. At the end, you’ll see:
- A score table listing each bot.
- An overall winner, based on score over all rounds.
Try re-running the battle with:
- Different sample opponents.
- More than two bots at once, to get a taste of melee battles.
Your First Battle in Robocode Tank Royale
Robocode Tank Royale has a different architecture: a game server (arena) plus separate bot processes that connect to it.
Starting the Server / Arena
Launch the Tank Royale server/GUI
- Start the Tank Royale application or server as described in its documentation.
- You should see a window or console showing the arena and a list of connected bots (initially empty).
Keep the server/GUI running while you start bots.
Note
The server and booter are included with the GUI installation. Stand-alone server and booter applications are also available in releases for users who want to run them independently of the GUI.
Starting and Joining Bots
In Tank Royale, bots are separate programs that connect to the server.
Start your bots
- Run your own bot (from the Your First Bot tutorial, if you have one).
- Run at least one sample bot or another simple opponent.
- Each bot typically starts in its own process (terminal window, IDE run, etc.), using configuration that tells it how to reach the server.
Wait for bots to register
- In the server/GUI, you should see a list of connected bots.
- Check that:
- Your bot appears in the list.
- At least one opponent bot also appears.
Again, ensure there are at least two bots connected. A battle with only one participant doesn’t make sense and will end immediately.
Creating and Starting a Match
Once your bots are connected:
Create or start a new game
- Use the server/GUI controls, for example:
- Click New Game, Create Battle, or Start (names may vary slightly by version).
- Use the server/GUI controls, for example:
Select participating bots
- In the game setup or lobby screen, select the bots that should take part.
- Choose:
- Your own bot, and
- At least one opponent.
- Confirm the list includes two or more bots.
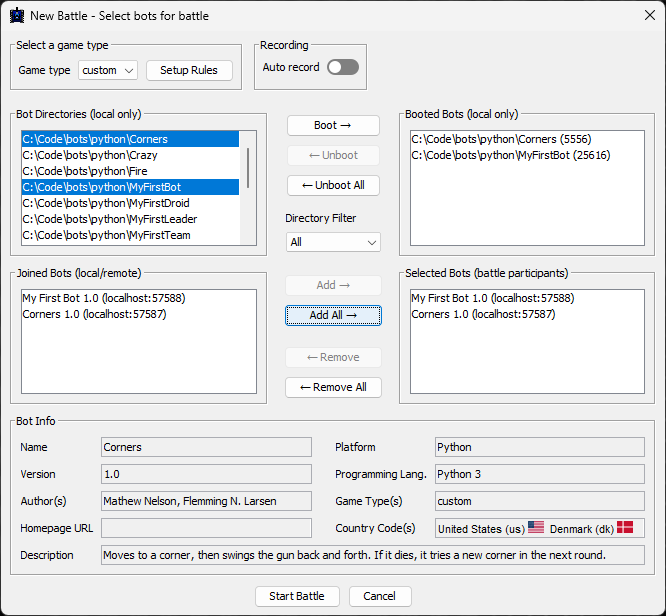
Bot selection dialog
Note
In Tank Royale, the Start Battle button will be inactive (grayed out) if too few or too many bots are selected for the chosen game type. If the button seems inactive for no clear reason, check which game type is selected—each game type has specific rules for the minimum and maximum number of bots allowed in a battle. Adjust your selection or game type to meet these requirements.
Use default settings
- Keep the default arena size and number of rounds for your first battle.
- Advanced options (like custom battlefield sizes or more participants) can come later.
Start the match
- Hit Start and watch the arena:
- Bots moving and turning.
- Bullets flying and explosions.
- Energy bars dropping as bots take hits.
- Hit Start and watch the arena:
The GUI usually shows a scoreboard and/or per‑round results so you can see which bot is winning over time.
Bullet basics: what your shots really do
When a bot fires, it is not free. Each shot spends some of the bot’s energy and creates a bullet that follows simple physics on the battlefield.
- Bullets cost energy to fire. The more powerful the shot, the more energy it costs.
- You cannot fire every turn. After each shot, the gun heats up and must cool down before firing again.
- Bullets travel in straight lines. They follow the gun’s heading at the moment of firing and do not curve or home in on targets.
- Bullets do not inherit your movement. Only the gun direction and bullet power matter for the bullet path and speed.
- Power vs speed tradeoff: low‑power shots are cheaper and fly faster; high‑power shots are stronger but slower.
- Friendly fire exists in team battles: a bullet will hit the first bot in its path, ally or enemy.
For a full explanation of bullet power, speed, damage, and cooldown (including formulas and charts), see Bullet Travel & Bullet Physics in the Battlefield Physics section.
Classic vs Tank Royale: How Battles Differ
The high‑level goal is the same—bots fight until only one is left—but the way you run a battle differs:
Classic Robocode
- Everything runs inside one GUI.
- Bots are loaded from the local bots directory and selected from a list.
- Starting a battle is mostly about choosing bots and clicking Start.
Robocode Tank Royale
- Uses a server/arena plus external bot processes.
- Bots connect over a network protocol (they can even run on different machines).
- Starting a battle involves:
- Running the server/GUI,
- Starting each bot so it connects,
- Selecting from the connected bots list, then launching a match.
Despite these differences, many game concepts are shared:
- 1‑on‑1 vs melee battles with many bots.
- Movement, targeting, and energy management.
- Running many quick battles to test improvements.
Bot configuration files
The platforms also differ in how bots are configured: Classic uses .properties files, while Tank Royale uses JSON. See Your First Bot for concrete examples of both formats.
Next Steps
After your first battle:
- Try different sample opponents and see how your bot performs.
- Add more bots to the same battle to get a feel for melee chaos.
- Experiment with:
- More rounds,
- Different battlefield sizes,
- Different starting positions (if supported).
Then, move on to deeper topics in the book:
- How the battlefield works (geometry, coordinates, walls).
- Radar and scanning to find enemies more reliably.
- Targeting and movement strategies to win more battles.
- Energy and scoring to understand why some bots "win" even without many kills.
For more detailed, up‑to‑date instructions and screenshots, you can always refer to:
- Classic Robocode basics and first bot tutorials on the RoboWiki.
- Robocode Tank Royale getting‑started guides and examples on robocode.dev and GitHub.
Your first battle is just the beginning. The real fun comes from iterating: tweak your bot, run a few battles, observe, and improve.